Find help...
How to exclude and prevent bats from living in my house in Pennsylvania | Bat
Pennsylvania > Animal is living inside my attic > Bat
How to exclude and prevent bats from living in my house
Step 1
Detecting the presence of bats roosting in attics, walls, and roof spaces of homes is often done by finding their rodent-like guano (feces) in attics or below entry points on decks, walks, or associated staining on siding. You may hear bats moving around in walls at night or see them exiting openings at dusk.
Avoid direct contact with bats. Bats are linked to several diseases (e.g., rabies, histoplasmosis) that pose a human health risk, so their presence — past or present — in your home is a serious matter.
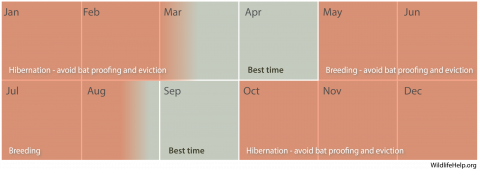
You should not undertake bat eviction and bat-proofing work during the bat breeding season (beginning in May or June, depending on location, through mid-August). Flightless young may be trapped and die in the roost, causing severe odor problems. Bat-proofing is also not recommended in winter from October through late March or mid-April (depending on location) since big brown bats may hibernate in homes under insulation and walls resulting in their entrapment and death when they awake and become active in the spring. They may also enter the interior of homes in their efforts to escape.
Eliminating bats found roosting in homes and preventing future invasion involves these three steps:
- Evict, exclude
- Seal
- Clean up (very carefully)
Step 2
Evict, exclude
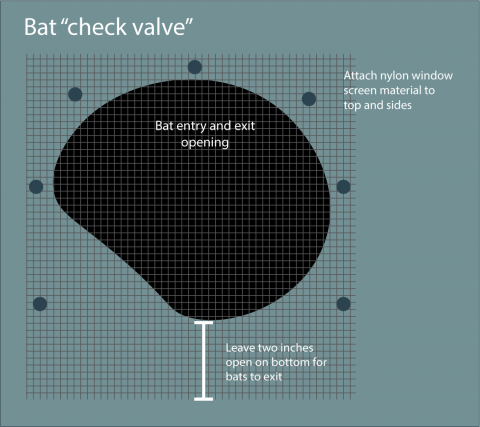
Install bat "check valves," bat cones, or other one-way door excluders over active openings that allow bats to exit but prevents their re-entry. Check valves and cones should effectively evict all resident bats in a few days, after which you can remove valves and seal openings.
Bat check valves can be made with nylon window screen material attached above, on the sides and allowed to hang over an opening. Extend the screen material two inches below the opening, leaving the bottom loose enough for bats to exit underneath.
Another simple one-way excluder can be made from plastic strips. In a section of flexible plastic, cut small strips (about 1-inch wide) that will serve as tiny door flaps. Bats can push past them to exit, but the strips will not flex inward to allow re-entry. This excluder should be installed in the same manner as the screening or netting.
Exclusion of bats from Spanish or concrete tile roofs is often as simple as installing a rain gutter. The gutters should be installed flush against the attachment surface. The upper edge of the gutter should be even with the lower edge of the tile, extending outward about eight inches. This exclusion can be done any time because bats are still able to leave. Bats dislike climbing over a slippery metal gutter and usually will not return. Evicted bats may try to re-enter the building looking for alternative openings.
Step 3
Seal
Carefully inspect the room and adjacent spaces and try to locate all openings used by bats to access your house. Determine active entry points by watching outside bat movements and activity at dusk to find out where bats are entering and exiting. Look for guano or smell for urine odor throughout the area, which will usually be found near active entry points. Make sure (as best you can) that all the bats are out of the house, then seal all inactive (potential) entry points that are not being used by bats, including:
- Gaps and openings larger than 1/4 inch
- The bottom of doors and around windows
- Around rooflines, siding, brick/stone work, vents, etc.
To properly seal such gaps use professional construction methods including foam caulk (Todol™, Great Stuff™), backer rod, knitted wire mesh (stuff-it), hardware cloth, flashing, caulk, sealants, insulation, or weatherproofing materials. You can minimize the likelihood of home entry via the chimney with a chimney cap with 3/8-inch wire mesh.
Step 4
Clean up (very carefully)
After all bats have been evicted or removed, carefully clean up and dispose of any guano (bat fecal pellets).
Bat droppings are similar to mouse droppings, but are longer and segmented and often clustered. They are often found concentrated below roosts. When dry they can be easily crushed, revealing bits of shiny undigested insect parts.
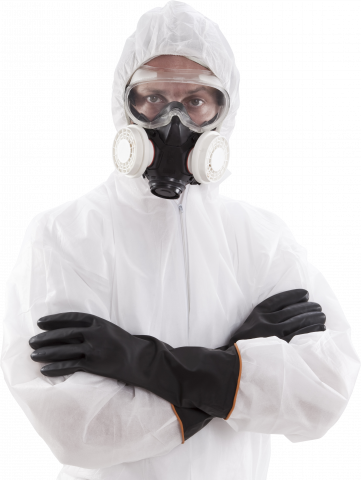
Clean-up of bat guano may present health risks to workers and residents from breathing fungal (histoplasmodia) spores aerosolized in dust. Anyone cleaning areas contaminated with bat guano should follow CDC guidelines and always wear a HEPA-rated respirator, gloves, coveralls, etc. Dampen guano using a 10 percent bleach solution to reduce dust, then scoop the droppings into a plastic bag. Dispose of the bagged waste in your trash that is going to a licensed landfill as it may be considered hazardous material. For large scale guano removal projects, professionally trained workers using HEPA vacuums and fully contained respirators may be required to safely remove bat guano. Clean and disinfect all equipment used in bat guano clean-up.
Laws and regulations to be aware of
While we attempt to provide guidance about state and federal regulations pertaining to specific species and control techniques, we do not provide information about local jurisdictions (city, town, county, etc.) where regulations may be more restrictive, especially as it applies to discharge of firearms, transport of animals or use of trapping equipment. Contact your local city or county government to inquire further. No guarantee is made that information (or lack of information) associated with a species or control technique is completely accurate or current. You should become familiar with federal, state and local laws before beginning any wildlife control activities. |
More solutions for bat problems


